

¡Hola y bienvenido a Sallie Tomato!
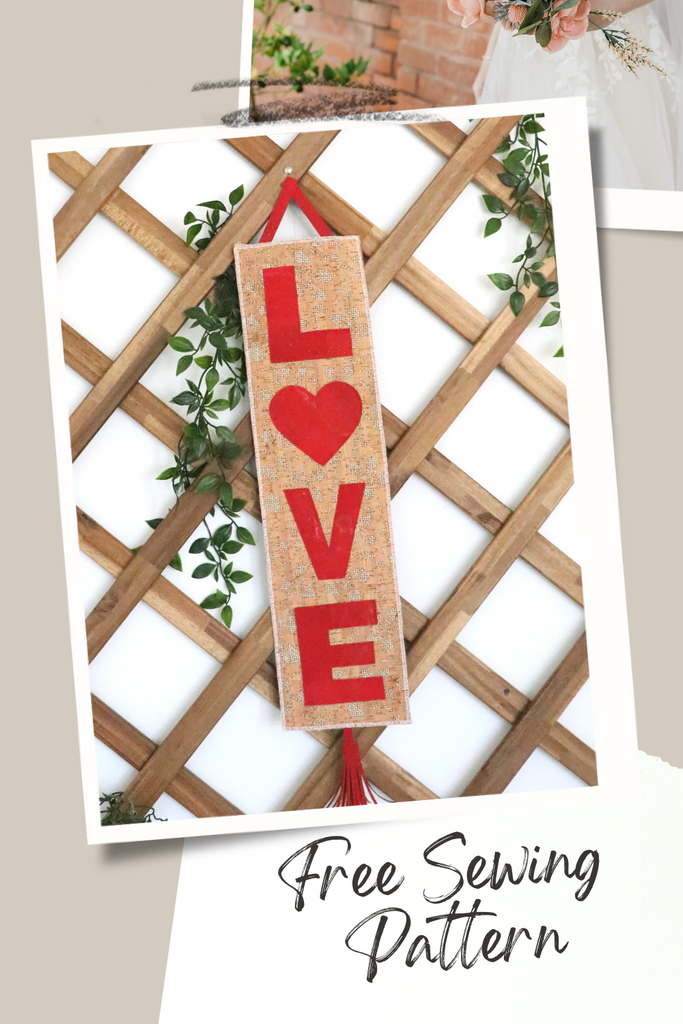
Hoy presentamos un cartel fácil de coser diseñado por la mamá de Jess, Renee. Su elección de telas, piel sintética y corcho, hace de este un proyecto divertido para cualquier nivel de creador o costurero, ¡desde principiante hasta experto! Y también sería divertido usar retales de otras telas que no se deshilachen. Ofrecemos un patrón de descarga gratuita que incluye recomendaciones de telas, plantillas de letras, instrucciones de corte, así como herramientas y suministros útiles.
¡Descarga el patrón gratis aquí!
Necesitará sólo tres telas para su pancarta: una tela principal, una tela de respaldo y una tela de contraste.
1. Coloque la tela de contraste con el revés hacia arriba, luego coloque las plantillas, también con el revés hacia arriba, sobre la tela de contraste y trace los bordes con un bolígrafo o tiza extraíble.
2. Recorta cada letra, quitando las marcas a medida que cortas. Luego puedes dejar las letras a un lado mientras preparas el panel del banner.
3. Si te gusta el aspecto de una borla en la parte inferior del cartel, móntala primero. Asegúrate de consultar nuestro tutorial para hacer una borla en youtube.com/sallietomato .
4. A continuación, necesita la percha: con las piezas de la percha C con el lado derecho hacia arriba, superponga dos extremos para formar una “v” y sujete la punta con un clip de costura o cinta adhesiva. Los extremos libres opuestos deben estar a aproximadamente 4" de distancia. Ajuste la superposición si es necesario y agregue cinta de hilvanado de doble cara para sujetarla de manera más segura. Haga un pespunte justo dentro del área de superposición, creando una forma de diamante aproximada. Si lo prefiere, puede usar un pegamento permanente en lugar de coser.
5. El siguiente paso es opcional, todo depende de lo que te guste: Agrega una puntada overlock o sobrehilada, cubriendo los bordes del Panel Frontal. Utilice los trozos de tela sobrantes para probar su costura.

6. Coloque el panel posterior con el revés hacia arriba y centre el colgador y la borla en los extremos cortos opuestos. Utilice cinta adhesiva o pegamento para mantenerlos en su lugar.

7. Coloque trozos adicionales de cinta para hilvanar alrededor de los bordes del panel, o use un spray para hilvanar y luego agregue el panel frontal, con el lado derecho hacia arriba, alineando todos los bordes. Si lo desea, agregue clips de costura, sujetando los bordes con seguridad y luego haga un pespunte a lo largo de todos los bordes. Nuestra muestra está cosida con un margen de 1/8", ¡pero ciertamente puede elegir un ancho diferente si lo desea! Otra opción es simplemente pegar las capas con un pegamento permanente para manualidades o para tela.

8. ¡Estás listo para agregar AMOR! Aplique cinta adhesiva, pegamento o spray en el lado equivocado de las letras. Colócalos en el Panel Frontal, hasta que te guste el arreglo. Aquí es donde la cinta de papel puede resultar útil: coloque y pegue las letras; la cinta de papel no dañará estas telas, puede coserlas y luego arrancarlas fácilmente después de coserlas. Una opción sencilla es utilizar pegamento permanente para mantenerlos en su lugar. 
¡Tu banner está completo y listo para colgar o regalar! ¡O úsalo como punto de partida para tu creatividad!
Se nos ocurren todo tipo de formas divertidas de personalizar tu LOVE Banner: añadiendo adornos en los bordes, flores de seda, cuentas, cristales o lentejuelas, monogramas bordados... Por eso nos encanta cuando compartes una foto de tus proyectos #sallietomato y #patróndebannerdeamor!
¡Gracias Renee por este encantador patrón y esperamos que tengas un gran día compartiendo el amor por hacer!
Kate de Sallie Tomate


Dejar un comentario