

Learn how to make a classic, simple set of cork fabric and faux leather coasters, with an optional initial or monogram! Make your own custom set of coasters to complement your décor. Cork fabric and faux leather provide a soft landing for glasses and cups while protecting your furniture from messy drips.
This is a great project for beginners. Make custom coasters for the holidays, weddings, kids' rooms, and everyday décor. They're great for stocking stuffers, grad gifts, teacher and co-worker appreciation gifts, or even just for yourself! The finished size is 4" by 4" round or square. Let's get started!
Supplies:
- Cut (2) 4" round or square pieces of cork fabric or faux leather for each coaster you want to make
- TIP: To cut perfect circles, use an Ofla Circle Cutter
- Optional Monogram Letters or choice of applique
- Basting Spray
- Wonder Clips
- Polyester Thread
- Teflon Foot
- Narrow Foot
STEP 1
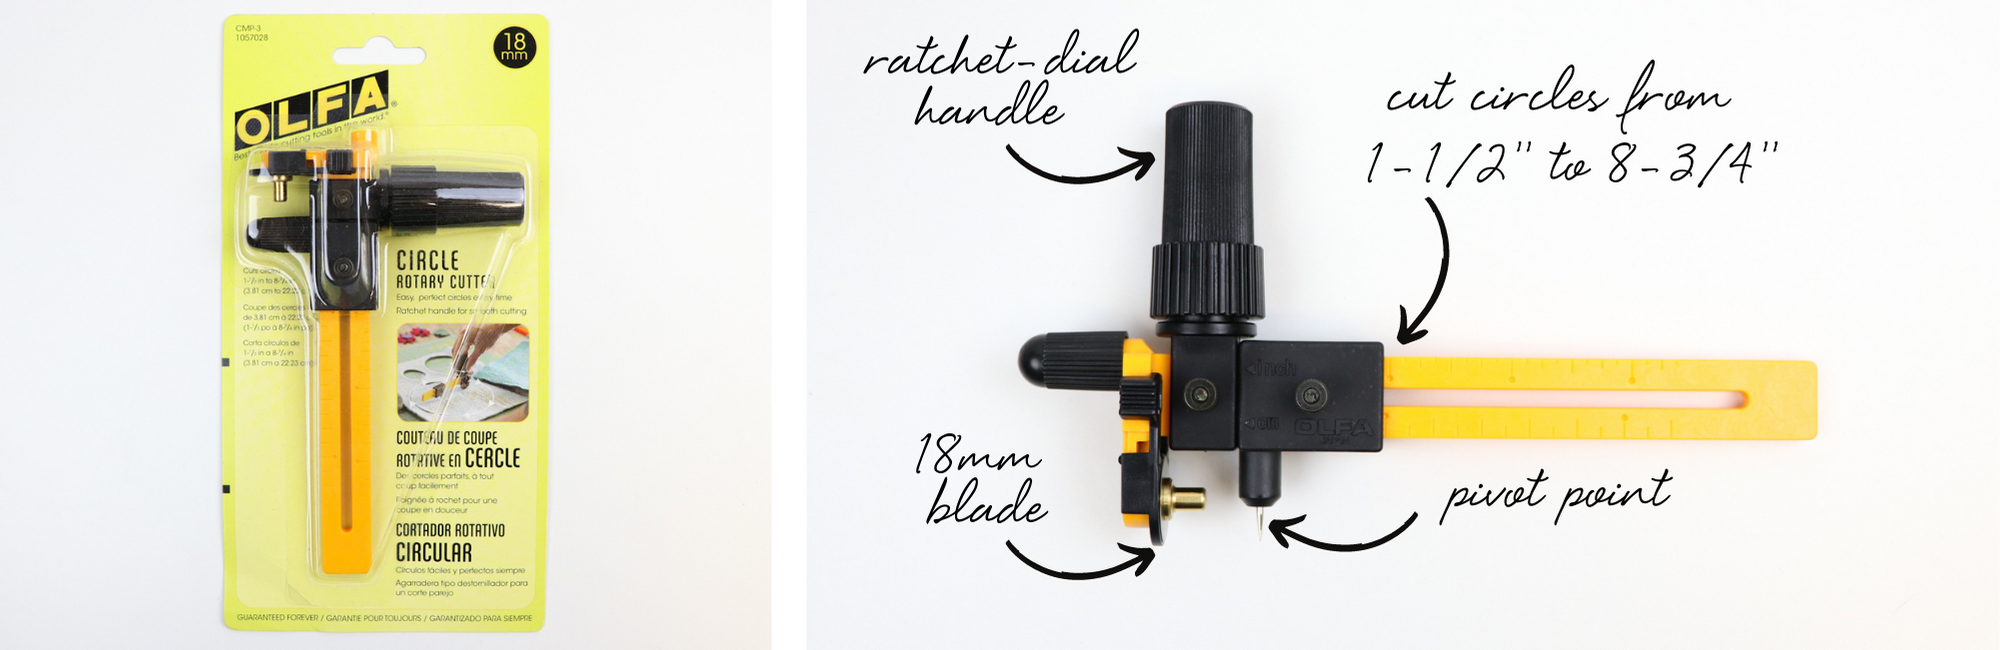
If making round coasters, I highly recommend using an Ofla Circle Cutter! Effortlessly cut perfect circles from 1-1/2" to 8-3/4" wide. The ratchet-dial handle reduces wrist fatigue. The simple "stirring the soup” cutting motion prevents uncomfortable twisting or strain. This cutter has a built-in blade cover and plastic pivot-point guard for safety. Also, the cutter comes pre-loaded with an OLFA 18mm Stainless Steel Rotary Blade. I think you'll find it's very easy to use and has a variety of applications - besides just cutting circles!
STEP 2
If using an Ofla Circle Cutter, adjust the pivot point to 2" inches. Whenever you're using this circle cutter, you'll want the pivot point to be at half of your desired dimension. 
STEP 3
Place the pivot point on your fabric, and raise the blade cover on the circle cutter. Gently press down enough for the blade to cut through the fabric and move the blade in the "stirring the soup" motion to cut your circle. 
STEP 4
Apply Basting Spray to the wrong side of your optional applique. I like to place my applique on top of a scrap of newspaper when I spray to prevent my worktable from getting sticky.

STEP 5
With right sides up, center your applique on one coaster.

STEP 6
When sewing with cork fabric or faux leather, it's best to use a Teflon foot or roller foot to help prevent your fabric from sticking to the underside of your presser foot. Otherwise, you can add a layer of tissue paper between your presser foot and your fabric while you sew. The tissue paper can be torn away after sewing. Another option is to add a small piece of matte tape to the bottom of your presser foot.
If you don't have an issue with your fabric sticking to your foot, a Narrow foot is a great option for sewing close to the edge of your applique.
Once you decide on the type of presser foot you're using, topstitch your applique in place 1/8" from the raw edges.


STEP 7
With wrong sides together, align all edges of your two coaster pieces. Use Basting Spray and/or Wonder Clips to hold the pieces together. Do not use pins because they will leave permanent holes in your cork and faux leather. Topstitch the pieces together 1/8" from the raw edges.

Repeat these steps to make as many coasters as you'd like! I hope you enjoyed this tutorial. If you have any questions, we're here to help, so please just ask. We’d love to see your completed project! So, be sure to share your photos on social media with #sallietomato! Share and see photos of this pattern in the Sallie Tomato Patterns & Hardware Group on Facebook!
![]()


Leave a comment